Setting up a TypeScript project from scratch
Whether you’re starting a new web app, library, or tool, TypeScript provides strong typing and modern features that enhance your development experience. In this guide, I’ll walk you through the essential steps to set up a TypeScript project from scratch. We’ll cover everything you need to know, including installing TypeScript, creating a tsconfig.json file, and structuring your project. By the end, you’ll be well-equipped to build robust applications using TypeScript!
Before you start coding, make sure you have the necessary tools installed. Follow these steps to set up your development environment.
Node.js
- Install Node.js (if you haven’t already).
- Node.js provides the runtime environment for executing JavaScript on your machine.
Visual Studio Code
- Download and install Visual Studio Code.
- VS Code is a powerful code editor with great TypeScript support and a wide range of extensions.
Git
- Install Git (if not already installed).
- Git is essential for version control and collaborating with others.
I will not talk much about the above as you may already know these well and each one needs a separate blog to describe them.
To verify the installations, you can use the following commands.
node --version
git --version
code --version
Next create a new directory with your project name and run the following command.
npm init --yThis will create a package.json file in your project. ‘ — y’ or ‘ — yes’ will enforce that you will not go through the interactive setup project and create the project with default values. This command is useful when you want to quickly create a basic package.json file without manual input. It’s commonly used for setting up new projects or initializing existing ones.
You can run the following command to initialize your project as a git repo.
git --initNow let’s install the packages we need to code our TypeScript app. You can use the following npm command to install these packages.
npm i -D typescript ts-node nodemon tsconfig-pathsHere I have installed these libraries as dev dependencies as these are only needed in are only needed during local development or testing. These packages are not included in the production build. The advantage is separating dependencies allows you to keep your production build lightweight. It ensures that users don’t download unnecessary development tools when installing your application.
TypeScript is a language designed for application-scale JavaScript development. It enhances JavaScript by adding optional static types, which provide better tooling and support for large-scale projects. The TypeScript library provides all the language functionalities and compilation and tooling support.
ts-node is a powerful TypeScript is a language designed for application-scale JavaScript development. It enhances JavaScript by adding optional static types, which provide better tooling and support for large-scale projects. ts-node dynamically transforms TypeScript code into JavaScript on-the-fly, allowing you to run TypeScript files directly. It hooks into Node.js’s module loading APIs, making it seamless to use alongside other Node.js tools and libraries.
When an error occurs, ts-node provides automatic sourcemaps in stack traces. This feature helps you quickly identify the location of issues in your TypeScript code.
ts-node includes a REPL(read-eval-print-loop) mode, which lets you interactively execute TypeScript code. You can start the REPL by simply running ts-node without any arguments. Also, ts-node works seamlessly with test runners, debuggers, and other CLI tools. You can use it during development or integrate it into your build process.
nodemon is a powerful utility that simplifies Node.js development by automatically restarting your server whenever it detects changes in your source code. When you run your Node.js application with nodemon, it continuously monitors the files in the specified directory. If any file changes (e.g., code modifications, new files), nodemon automatically restarts your server. This is especially useful during development, as you don’t need to manually stop and restart your app after every change.
tsconfig-paths npm package serves a crucial role in TypeScript development by allowing you to map module paths based on the paths defined in your tsconfig.json file. When working with TypeScript, you can define custom path mappings in your tsconfig.json using the paths option. These mappings allow you to specify aliases for module paths (beyond relative or absolute paths) and map them to physical paths in the filesystem. Instead of using long relative paths like ../../../myModule, you can create shorter, more readable aliases. For example, you could map @app to your application’s root directory.
Now let’s add a gitignore file to our project. You can create a new file in your project with the name of .gitignore. The purpose of a .gitignore file is to ensure that certain files, which are intentionally untracked, remain untracked by Git. By adding these files to the .gitignore, you prevent Git from including them in commits or considering them for tracking. Add the following to the gitignore file.
node_modules
dist
This will prevent node modules and dist folder committing to your repository.
Next run the following command to initialize a TypeScript project in the current directory.
tsc --initThis also creates a tsconfig.json file, which acts as the configuration file for the TypeScript compile. This contains various settings and options that influence how TypeScript compiles your code. Add the following code to your tsconfig.json file.
{
  "compilerOptions": {
    "target": "ESNext",
    "module": "commonjs",
    "outDir": "./dist",
    "removeComments": true,
    "esModuleInterop": true,
    "forceConsistentCasingInFileNames": true,
    "strict": true,
    "skipLibCheck": true
  }
}
We are using the target as “ESNext” as we want to use whatever the next version of ECMAScript (JavaScript) is at the time of writing. It represents features that are still in the proposal stage and have not yet been finalized in the official specification. For production apps you can select a different version as per your requirements. ESNext doesn’t correspond to a specific version (like ES6 or ES2015). Instead, it represents the ongoing evolution of the language.
Here we are using CommonJS which is a module system used in JavaScript, particularly with Node.js. CommonJS defines a set of standards for structuring and organizing JavaScript code into modules. It allows developers to break down their code into smaller, reusable pieces, making it easier to manage and maintain. CommonJS modules are commonly used in server-side JavaScript applications with Node.js.
Now let’s create a src folder in your project root and add app.ts file. This should be how your project structure looks when you open it from VS Code.
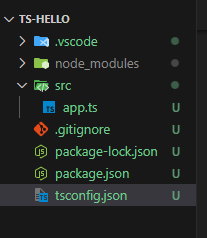
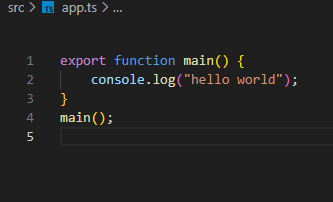
Let’s talk about .vscode folder later. You can add the following code to your app.ts file to make sure your app works.
Now let’s run your app. Here we will use Nodemon. Add the following to your package.json under the scripts section to configure Nodemon.

Run the following npm command to run your app.
npm run devYou can see the following output.

If you change the app.ts file, you can see Nodemon will automatically restart your app.
Debugging with VS Code
Now let’s debug our TS app using VS Code. First you need to create a launch.json file to provide debugging configuration to VS Code. It resides in the.vscode folder within your project directory.
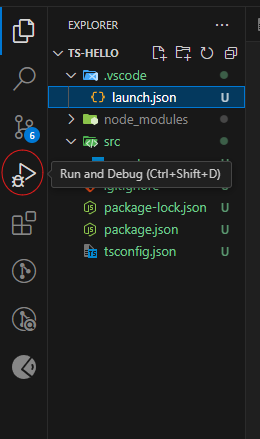
Click “Run and Debug” icon in the left pane of the VSC. Then click add configuarion and paste the following in your launch.json file.
{
    "version": "0.2.0",
    "configurations": [
        {
            "type": "node",
            "request": "launch",
            "name": "Debug App",
            "skipFiles": [
                "<node_internals>/**"
            ],
            "program": "${workspaceFolder}\\src\\app.ts",
            "runtimeArgs": [
                "-r",
                "ts-node/register",
                "-r",
                "tsconfig-paths/register"
            ],
            "outFiles": [
                "${workspaceFolder}/**/*.js"
            ]
        }
    ]
}
Now you can debug your app. To test this add a breakpoint to app.ts file and then click “Debug App”.

Here you can see how it debugs in VSC. In most cases, it’s recommended to commit launch.json to your repository. Committing launch.json ensures that all team members use the same debugger settings. It avoids discrepancies between development environments. Shared Configurations: If your project has specific debugging configurations (e.g., for different environments or scenarios), sharing them via launch.json is beneficial. Integration with Source Control: Committing launch.json allows you to track changes over time and revert to previous configurations if needed.
Creating a Production Build
Here we are creating a basic TS app and not any Frontend specific app, I will ignore the minification process. Also, it is not mandatory as NodeJS is already performing optimizations for NodeJS code.
Transpiling TypeScript to JavaScript is the process of converting TypeScript code (which includes type annotations and other TypeScript-specific features) into plain JavaScript code that can be executed by browsers or Node.js.
Add the following npm package to clean your dist folder.
npm i -D rimrafNext add the following to package.json file scripts section.

You can see dist folder when you run the following command.
npm run buildTo run the js file using nodejs you can use the following command.
npm run startHappy coding!